How to Get the Whisper of the Worm in Destiny 2
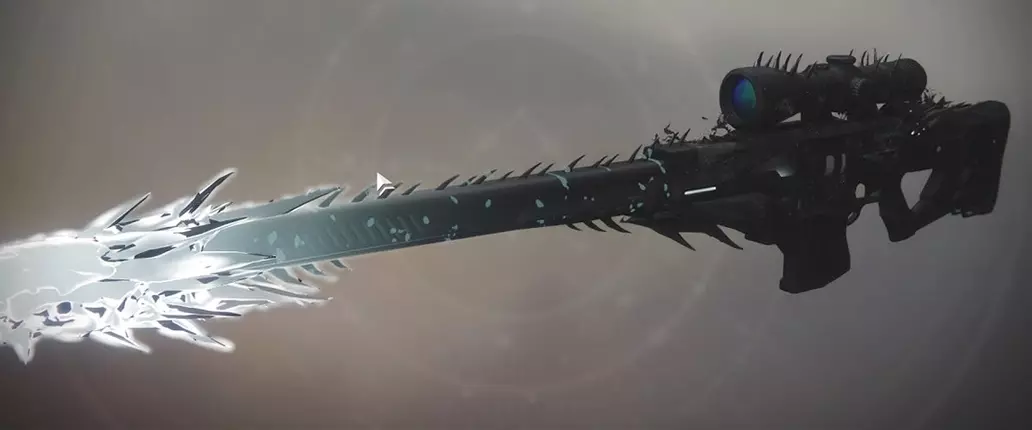
The Whisper of the Worm is the Black Hammer Guardians wanted in Destiny 2.
The minute someone mentioned a secret quest in Destiny 2, my entire day went off the rails in the best way possible. Early rumors were that the Black Spindle quest had finally appeared, and I was all in to work on a Friday night. Turns out it wasn’t the Black Spindle, but it’s the spiritual successor of the Black Hammer, and we’re talking pre-nerfed Black Hammer. Here’s how to get the Whisper of the Worm exotic sniper rifle in Destiny 2 by completing the secret quest called The Whisper.
How to Get the Whisper of the Worm

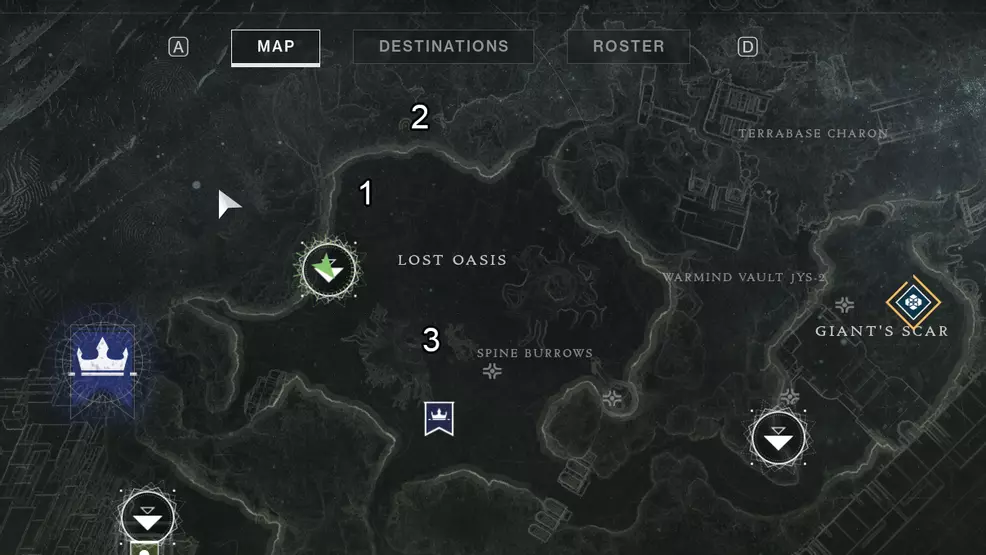
The first step to unlock the Whisper of the Worm in Destiny 2 is to head to Io on patrol. You’ll want a full team of three Guardians, and everybody should be veteran killers at or near the maximum Power level. Once on Io, head to the Lost Oasis region and wait for the Taken Blight public event to spawn. You don’t need to finish it, but it’s what coincides with the spawn of three key enemies.
• Urzok, Aspect of Hate
• Drevis, Aspect of Darkness
• Ta’urac, Aspect of War
When any Taken Blight public event begins in Lost Oasis, one of these three will spawn in one of three locations:
- Left of the fast-travel point, in a crevice below ground
- Left of the fast-travel point, up in a cave near the Lost Sector
- Right of the fast-travel point, below the tree
Find the enemy that spawned and kill them, then return to the rocks near the Grove of Ulan-Tan lost sector to see a portal. The fireteam leader of your group must pass through the portal, teleporting your team into the Grove of Ulan-Tan, the location of the secret mission for the Whisper of the Worm.
Secret Quest: The Whisper

The first thing to note is that The Whisper has a 20-minute time limit. If you and your team haven't finished the quest at that point, you’ll fail and must start again from scratch. This means waiting for another Taken Blight public even in Lost Oasis, then finding the corresponding enemy (listed above), and killing them. My team and I waited upwards to an hour at times, so expect to clear a chunk of your day to complete this if you don't get it on the first try.
The first half of The Whisper is simply a jumping puzzle that requires you to navigate subtle pathways. The goal here is to be all the way through the puzzle in five to six minutes, leaving you and your team about 15 minutes to complete the combat portion of this mission. Unless you and your team are elite, in which case you're already done this and don't need a guide, you're going to need almost all of the 15 minutes.
The final three rooms will be filled with loads of Taken and Taken Blights. The Taken Blights do not need to be destroyed, but it's advised you do so in order to clear firing lanes in each of the rooms. You can't shoot enemies behind these Taken Blights, so if three or four are active in a small space it can have a negative impact on your ability to clear the room. However, you can progress from whatever room you're currently in to the next by killing all the enemies. That's the trigger.
Fireteam Composition

This isn't strict, but you'll want at least one Hunter and one Titan, with the third player bringing whatever works best for them, or if you have your own strategy in place, bring the class that suits that strategy. The reason for the Titan is something called the Hammer Strike. This is a melee ability that the Sunbreaker subclass has when you select the Code of the Fire-Forged skill tree. When your melee ability is charged, sprint at an enemy and hit the melee button. Striking them will activate a buff called Melting Point, which causes your target to take 50 percent more damage from all sources for 15 seconds. This is huge in the boss fight, but must be coordinated with other members of your team and complemented by a few specific weapons.
The Hunter should be using the Arcstrider subclass with the Way of the Warrior skill tree. The specific perk we're after is called Lethal Current. With Lethal Current, after dodging, each Arc Staff hit creates a damaging lightning aftershock. The Hunter will also want to be using Raiden Flux, which has an intrinsic perk called Synapse Junctions where quick successive attacks with Arc Staff increase its damage output and duration. In a nutshell, the more damage you do with Arc Staff, the longer it lasts and the more damage it does. Arc Staff can be used to clear out almost the entire first room of the fight, allowing your team to move forward quickly. This should allow it to recharge the Arc Staff super ability fully in time to clear out the lower-level enemies when you reach the final room with the three bosses.
Weapon Composition

This is where it gets tricky because all bets are off when Guardians start going through The Whisper quest in heroic form and the elemental buffs change. The advice I give on what weapons to consider are for the normal version of The Whisper. Once you're through that, you'll have a much better idea of weapon composition.
- Tractor Cannon (Shotgun)
- Riskrunner (Submachine Gun)
- Curtain Call (Rocket Launcher)
- Hard Light (Auto Rifle)
- IKELOS_SG_v1.0.1 (Shotgun)
The Tractor Cannon is the big one. This exotic shotgun has an intrinsic perk called Repulsor Force, which means the weapon emits a powerful impulse that pushes enemies away, suppresses their abilities, and makes them more vulnerable to Void damage. This means that other members of the team should be running at least one Void weapon (perhaps a Void Curtain Call) to take advantage of this buff. It's also advised that the Titan who is running the Sunbreaker with Hammer Strike/Melting Point is the one with the Tractor Cannon. They are in the face of one of the bosses anyway, so it makes sense. When done correctly, one of the bosses will melt away in less than five seconds.
Another member of the fireteam should consider using the IKELOS_SG_v1.0.1 (Shotgun) for two reasons. First, it has the rapid-fire frame which allows it to go into fully automatic mode. More shells hitting your target in a short time is a good thing. Secondly, after a successful melee strike, the perk Trench Barrel kicks in, meaning this weapon gains increased damage, accuracy, and handling—within stricter damage falloff—for a short time.
The Riskrunner and Hard Light options are more about taking out the lower-level enemies that lead up to the bosses, or that surround the bosses. Hard Light allows players to change the elemental damage of the weapon. The first two rooms of the fight feature Void and Solar primarily, and the final room is full of Arc and Solar. Hard Light allows Guardians to adapt to the situation and work on lowering the shields of the enemies by matching the damage type.
Riskrunner is mostly useful in the final room. Risk Runner has an intrinsic perk called Arc Conductor, meaning when taking Arc damage, this weapon becomes more powerful and resists incoming Arc damage. Kills extend the time in this overcharged state. It also comes with a perk called Superconductor. When Arc Conductor is active, shots fired have the chance to become chain lightning and return ammo. In the final room, you can take more Arc damage, and you can deal more Arc damage, and if you use this weapon properly you will almost never have to reload it. We're talking sustained Arc damage against enemies that have Arc shields. This might be a good weapon for your Hunter, who is already running the Arcstrider subclass and is more or less going to work on clearing low-level enemies.
Completing the Final Room
The main goal of the final room is to split the attention between clearing enemy units and dealing damage to the bosses that spawn. At first, only one boss will enter, allowing players to "freely" move about and clear out the Taken Blights that can limit lines of sight. Once the first boss drops to a third health remaining, the two other bosses will enter the arena. At this point, they will bring with them their own enemy units, meaning that when one boss dies, those enemy types will no longer spawn.
Instead of whittling all three bosses down at the same time, try to focus on killing one, and then moving on to the other. Take some time to clear any enemy units that might get in the way of a Melting Point/Tractor Cannon run, as they can kill a player in a matter of seconds. With a clear path to a boss, focus all your effort on taking it down.
It can be a good idea to split up and have each player fight from a different side of the room. A good tactic can be to have two players in the right-hand tunnel and one player in the left, that way all the enemies aren't just focusing on the entrance. Having all three players fight in one spot means every single enemy will be focus-firing on a small area, making it next to impossible to attack a boss, especially with the Taken Captains throwing the blinding orbs.
With The Whisper completed, Whisper of the Worm will be unlocked, as will a Heroic version of the quest, found through the Director on Io. Players who manage to complete the Heroic version of The Whisper can unlock the Enigmatic Blueprint, an Exotic ship schematic. Keep up with the latest Destiny 2 coverage by stopping by Shacknews' complete Destiny 2 strategy guide.

